In this post we going to discuss on how to develop custom actions in SharePoint 2013 using visual studio 2013. Custom action are feature that extends the core features of SharePoint. The custom action can do the following things.
1. Navigate to a Form
2. Initiate a Workflow
3. Navigate to URL
2. Initiate a Workflow
3. Navigate to URL
Custom actions in apps can be deployed on the ribbon control or for menu item to provide new functionality for
lists or libraries in a host web to navigate to App web or App web to Host Web.
In this post we will discuss on two custom actions in Apps.
1. Ribbon custom action2. Menu Item custom action
This post is a continuation of previous post post where we have developed a Client / App part in SharePoint 2013. We will be using the same solution to create the custom actions.
Develop a Custom page using Angular JS and Bootstrap
First we will add a custom page and some customization using Angular JS and Bootstrap. We will create a simple application to manage our daily task. We should be able to create the task, Filter the task and delete a required task item.
Open the existing Solution which we developed for Client / App Part creation on our previous post using the visual studio 2013. Add a custom page. Right click on the Page and add new item.
Select page and give a name "DemoCustomActionPage.aspx" , we should be navigating to this app page using the functionality of custom action. In this page we will plugin the Angular JS framework and Bootstrap CSS framework. We will leverage some basic component from both of the framework and build a basic Task Management application(SPA).
Make changes to the "DemoCustomActionPage.aspx" as below , include the required script and css library from the CDN network to pugin the framework in SharePoint.
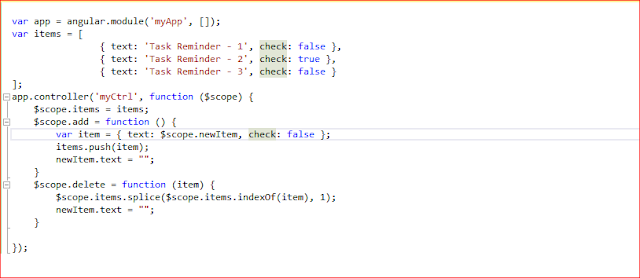
Add in required script content in the "App.JS" file as below.
1. Ribbon custom action
To add ribbon custom action for the App, right click on the project [Add->New Item->Ribbon Custom Action] and enter the Name and click on Add button. It will start the wizard for creating custom action for Ribbon control.
In this wizard select host web where we want to expose the custom action.The custom action can be scoped at List template or List instance or None. In our case we are selecting the List Instance and the custom action is scoped at the existing "Emp" list.
The wizard then requires where we would like to show the custom action in Ribbon control. We are selecting "Ribbon.ListItem.Actions" which with enable to show the custom action under Items section of List Ribbon control.
You can give the name of the custom action in label text for the button control section. If you have multiple pages then you can choose one to which you want to navigate.We have chosen the previously developed "DemoCustomActionPage.aspx" page. Once we are done with all the settings click on finish. It will create the required Ribbon custom action.
Below is the code snippet of elements.xml for the ribbon custom action which will generate
automatically for you based on your settings selected in the wizard.
After the deployment of the app project, Navigate to the host web and Click on the existing instance of Employee list on the Items ribbon you should be able to see the "My Ribbon CustomAction" button.
2. Menu Item custom action
To add a menu item custom action to the App projected, right click on the project [Add->New Item->Menu Item Custom Action] and enter the Name and click on Add button. It will start the wizard for creating custom action for Menu Item.
Select the host web to expose the custom action and choose a list instance and "Emp" list as custom action scope to then click on Next button.
Enter the menu item text you want to show and page in App where you want to redirect when the user selects the Menu item then click on the Finish button.
Below is a code snippet of the elements.xml file of Menu Item custom action which will generate automatically for you based on the selected settings on the wizard.
Save all the items, build the Project and deploy the App,once the app is been deployed, open the "Emp" hover over the period,an ECB context menu will appear with the item labeled "My Menu Custom Action".
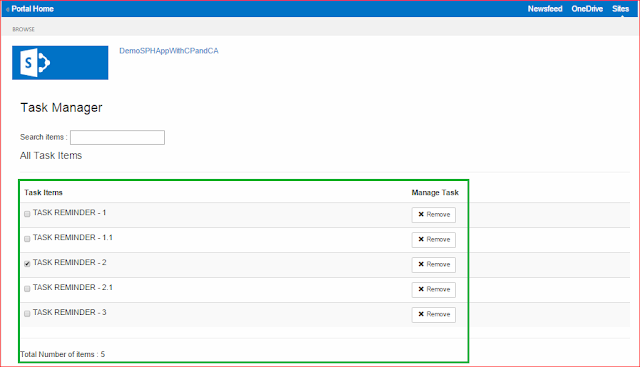
On clicking on the custom action ( ribbon / menu), users would be navigated to the previously developed custom App page "DemoCustomActionPage.aspx" as below.
Below screenshot demonstrates you , how to new add item functions in Task manager application.
Below screenshot demonstrates you , how the search functionality for the Task manager application functions.
On clicking on the custom action ( ribbon / menu), users would be navigated to the previously developed custom App page "DemoCustomActionPage.aspx" as below.
Below screenshot demonstrates you , how to new add item functions in Task manager application.


No comments:
Post a Comment