Monday, May 25, 2015

Set up for Basic High trust Provider Hosted App

In this post we are going to discuss on how to develop a Provider hosted app on SharePoint 2013 On-Premises environment using server to server high trust model.

A high-trust app is a provider-hosted app for SharePoint that uses the digital certificates to establish trust between the remote web application and SharePoint. Below is the request flow diagram for High trust app.


  1. The user clicks on the app link on the SharePoint page.
  2. SharePoint redirect to the app URL (No context token is provided in the app redirection request,which is not the same as in case of low-trust apps).
  3. The browser is redirected to the App URL as the response to SharePoint redirection.
  4. The app receives an HTTP request.The app builds the access token and signs it with its own certificate private key. This token is added to the SharePoint API call request.
  5. SharePoint validates the access token using the private key of the app certificate, and then returns the requested information.
  6. The app renders the HTML and returns it to the browser as a response.

We have the following three main steps to set up for the High trust Provided hosted App.

  • Create the Digital Certificate
  • Set up trusted token Service Application
  • Create a basic high-trust Provided hosted App

Step 1: Create a Certificate

On the server where you need to Host the remote web . Open the IIS Server.Click on the Server certificate Icon and then click on Self Signed certificate (only for Development) .Give a Friendly name to the certificate.


Once the Certificate is created, Right click on the newly created self-signed certificate and Export it in personal exchange format (.pfx) by providing the a password. This is the private key for the certificate.


Open the Certificate and click on the Details tab on the certificate , click on the "Copy to file" button on that tab.This will open up certificate export wizard.Click on the next button with the default setting and provide a certificate name and click on Finish


Step 2 : Set up trusted security token service

Generate a new GUID that can be used as issuer Id using the below command opening the Power Shell window.


Execute the below script to set the security token service.

  • IsTrustBroker: this flag ensures that you can use the same certificate for other apps as well.
  • Iisreset : to ensure the Issuer becomes valid, else it takes 24 hours.


Below is the output , running the above power shell script.


Step 3 : Create a Basic “High Trust” Provider Hosted App


Open Visual studio 2013 running as Admin and ,click on create new project. under Office/SharePoint section select App for SharePoint 2013. Enter a name and click OK.


Select the Developer site where you want to debut the App and then select the Provider hosted and click on Next.


Select ASP.NET Web Form and click on Next.


Select use a certificate option. Select the Private certificate, provide the password and the GUID for the Issuer ID and click on finish.


Open the Default.aspx page and modify the page as below and save it.


Execute and run the Project and on deployment you should visualize the app running as below as in the below attached snapshot.


Monday, May 11, 2015

Custom Action in SharePoint 2013

In this post we going to discuss on how to develop custom actions in SharePoint 2013 using visual studio 2013. Custom action are feature that  extends the core features of SharePoint. The custom action can do the following things.

      1. Navigate to a Form
      2. Initiate a Workflow
      3. Navigate to URL

Custom actions in apps can be deployed on the  ribbon control or for menu item to provide new functionality for 
lists or libraries in a host web to navigate to App web or App web to Host Web. 


In this post we will discuss on two custom actions in Apps.
     1. Ribbon custom action
     2. Menu Item custom action

This post is a continuation of previous post post where we have developed a Client / App part in SharePoint 2013. We will be using the same solution to create the custom actions. 

Develop a Custom page using Angular JS and Bootstrap

First we will add a custom page and some customization using Angular JS and Bootstrap. We will create a simple application to manage our daily task. We should be able to create the task, Filter the task and delete a required task item.  

Open the existing Solution which we developed for Client / App Part creation on our previous post using the visual studio 2013. Add a custom page. Right click on the Page and add new item.


Select page and give a name "DemoCustomActionPage.aspx" , we should be navigating to this app page using the functionality of custom action. In this page we will plugin the Angular JS framework and Bootstrap CSS framework. We will leverage some basic component from both of the framework and build a basic Task Management application(SPA)


Make changes to the "DemoCustomActionPage.aspx" as below , include the required script and css library from the CDN network to pugin the framework in SharePoint. 


 Add in required html content with the main content placeholder.


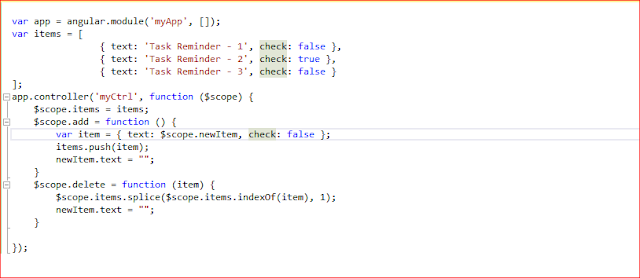
Add in required script content in the "App.JS" file as below.


1. Ribbon custom action


To add ribbon custom action for the App, right click on the project [Add->New Item->Ribbon Custom Action] and enter the Name and click on Add button. It will start the wizard for creating custom action for Ribbon control.


In this wizard select host web where we want to expose the custom action.The custom action can be scoped at List template or List instance or None. In our case we are selecting the List Instance and the custom action is scoped at the existing "Emp" list.

Once you have selected above options click on Next button.


The wizard then requires where we would like to show the custom action in Ribbon control. We are selecting "Ribbon.ListItem.Actions" which with enable to show the custom action under Items section of List Ribbon control.


You can give the name of the custom action in label text for the button control section. If you have multiple pages then you can choose one to which you want to navigate.We have chosen the previously developed  "DemoCustomActionPage.aspx" page. Once we are done with all the settings click on finish. It will create the required Ribbon custom action.

Below is the code snippet of elements.xml for the ribbon custom action which will generate 
automatically for you based on your settings selected in the wizard. 


After the deployment of the app project, Navigate to the host web and Click on the existing instance of Employee list on the Items ribbon you should be able to see the "My Ribbon CustomAction" button.


2. Menu Item custom action

To add a menu item custom action to the App projected, right click on the project [Add->New Item->Menu Item Custom Action] and enter the Name and click on Add button. It will start the wizard for creating custom action for Menu Item.


Select the host web to expose the custom action and choose a list instance and "Emp" list as custom action scope to then click on Next button.


Enter the menu item text you want to show and page in App where you want to redirect when the user selects the Menu item then click on the Finish button.


Below is a code snippet of the elements.xml file of Menu Item custom action which will generate automatically for you based on the selected settings on the wizard.


Save all the items, build the Project and deploy the App,once the app is been deployed, open the "Emp" hover over the period,an ECB context menu will appear with the item labeled "My Menu Custom Action".


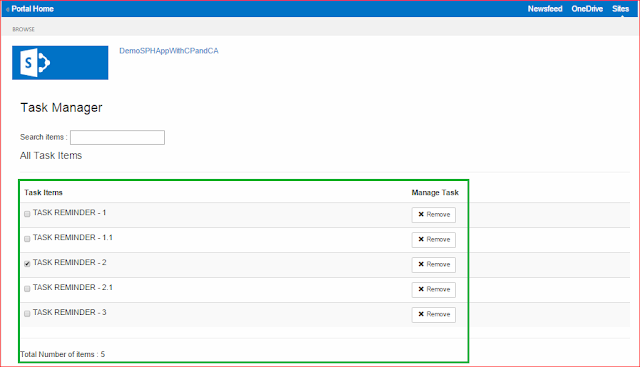
 On clicking on the custom action ( ribbon / menu), users would be navigated to the previously developed custom  App page "DemoCustomActionPage.aspx" as below.


Below screenshot demonstrates you , how to new add item functions in Task manager application.


 Below screenshot demonstrates you , how the search functionality for the Task manager application functions.   


Monday, May 04, 2015

Client/App Part in SharePoint 2013

In this post we are going to discuss one of the important SharePoint concept know as the  Client / App part.

    What is Client Part


    Client/App Part are partially similar to share point web part but are not web part.end users always are existed t know about web parts and the easiness, how they could  add a web part, editing a page and inserting a web part on a SharePoint page and see some compelling functionality out of it.Apps can also work similar to web part. It is not a real web part it something similar to it. Client part lives in an Iframe looks similar to web part but does not have full functionality as what a SharePoint web part does have.

    Let's develop a client part. To start with let's open visual studio in administrator mode.
    Open a new project of type "Apps for SharePoint 2013" template under Visual C#> Office / SharePoint > Apps.

    Enter the project name as "DemoSPHAppWithCPandCA" and provide the location where the code will reside. Click ok.Then it would It will open the wizard to create the project. Select the site where you want to deploy the app . Select Hosting option as SharePoint-hosted. Once you click on finish. The SharePoint hosted app Project is created for you.

    Right click on the project ,Add new item , Select "Client web part" and enter the name of your client web part then click on Add button.


    A new wizard is started, where  you can enter your Client \ App part Name and Select / Create  the Page which you want to show on the App part, for this scenario we will create a new page, then Click on Finish.Now in the Solution,you would see the app part and the newly created page, which will be rendered in the App part.


    If you see the code snippet for "DemoClientWebPart.aspx" page. The "<WebPartPages:AllowFraming ID='AllowFraming' runat='server' />" which is required to allow the page to show in IFrame.

    What we are going to accomplish is , create a custom app part property and render that property on the Client/App part. 

    Let's open the "element.xml" for the DemoClientWebPartPage.aspx ,Modify the Client part title,  add a custom web property "PageTitle" and modify the "src" attribute of the Content type element,check the query string format as below.


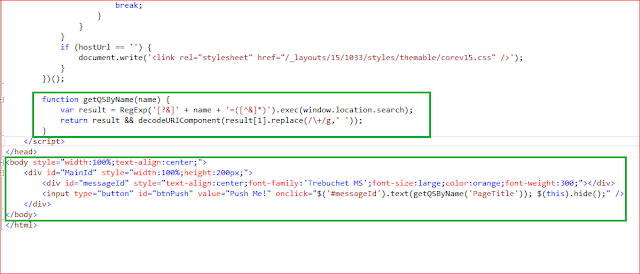
    Add in the html, css and java script to the "DemoClientWebPartPage.aspx" page as below.

    Save the modified pages and run the solution.Navigate to the Host web and click on edit page. click on the insert tab on the page ribbon. Click on the App part and select the app part with the title "Demo Client Part" and click on ADD as below.


    On Adding the Client part on the home page, the page would look as below.


    On Clicking the "Push Me!" caption button on the Client / App part. you should see the desired text result as below.


    Monday, April 27, 2015

    Developing a SharePoint Hosted App

    In this post we are going to talk about how can we Develop a SharePoint hosted Apps. This is divided in two primary steps.
    1. Develop the SharePoint Hosted App
    2. Discover the Deployed SharePoint Hosted App
    Step - 1 : Develop the SharePoint Hosted App

    Open visual studio 2013 , click on new Project , Select Apps for SharePoint 2013 template under Visual C# >Office/SharePoint>Apps.


    Enter the project name as "DemoSPHApp" and provide the location where the code will reside.Click ok.Then it would It will open the wizard to create the project. Select the site ( Based on Developer / Team site definition) where you want to deploy the app . Select Hosting option as SharePoint-hosted.


    Click Finish. You would see primarily four main folders.
    1. Content - Responsible for App Content
    2. Images - Repository  for App Images
    3. Pages - All the app pages that needs to be deployed are stored in this location
    4. Script - All the scripts that is required for this app to function
    Press  F5 and try to deploy the solution.you might run into the below error if you are trying to execute with the system account.

    "Error occurred in deployment step "Installed app for SharePoint": The System Account cannot perform this action".

    The Golden thumb rule is that ,You cannot deploy the apps with system account.Create another account, Provide the required permission on the SharePoint site and open the SQL server management studio and assign the db_owner permissions to this account, which you will be using to deploy the app for following databases.
    1. SharePoint_Config
    2. SharePoint_Admin_ [GUID]
    3. ContentDB to which the app is host. 
    4. Appmanagement_ServiceDB (app management service application database).
    5. SubscriptionSettings_ServiceDB (Subscription Settings service application database). 
    Now use that account to deploy the apps using visual studio. I get the below error.


    So now we Open the appmanifest file and Increment the app version by one. Now the App version is incremented from version 1.0.0.0 to 2.0.0.0. We also have modified the page title text on the "default.aspx" under the pages folder from "Page Title" to "Welcome to my First SharePoint Hosted App". Try to deploy the solution using the Visual Studio, one more time. Voola we see the new App.  


    Step - 2 : Discover the Deployed SharePoint Hosted App

    Click on Site content or you should be able to discover the newly deployed app on the left navigation (launch)  bar of the host Web.


    Note : you can even publish the App using Visual Studio, Register the App on the App Catalog and make it Discoverable.