Saturday, June 30, 2018

NINTEX - DISABLING HEADER AND FOOTER IN NOTIFICATION MESSAGE

Problem Statement: In Nintex workflow, how to disable the header and footer sent in a notification message.
INSTRUCTIONS
  1. Go to SharePoint Central Admin > Application Management.
  2. Click on Global Settings.
  3. Clear the selection for 'Enforce message header and footer'.
When this option is enabled, all email notifications will include the configured header and footer. If this option is disabled, workflow designers will have the option to exclude the header and footer on email notifications.

Alternatively you can change the default header / footer section at three different level Farm level, Site collection level and web level.


1.    In Central Administration, going into Nintex Administration you can find the Message templates link.
2.    For Site collection, you have to go to Site settings and select Message templates   
3.    For Web, you have to go to Site settings and select Message templates 

Reference

https://community.nintex.com/docs/DOC-6384-customize-workflow-notification

THIS PAGE ALLOWS A LIMIT OF 200 CONTROLS, LIMIT HAS BEEN EXCEEDED IN SHAREPOINT


Problem Statement: This page allows a limit of 200 controls, and that limit has been exceeded in SharePoint


Solution:
1.    Browse to the Web application “C:\inetpub\wwwroot\wss\VirtualDirectories\”
2.    open webapplication in question
3.    open web.config for that web application
4.    Find the tag below in the web.config

<SafeMode MaxControls="200" CallStack="false" DirectFileDependencies="10" TotalFileDependencies="250" AllowPageLevelTrace="false"> 

By default  MaxControls="200" is set to 200.So you get the exception.

You can change this according as per your requirement. This should resolve the issue.


IMP URL SHORTCUTS IN SHAREPOINT


Here is the list of Quick URL Shortcuts to Frequent SharePoint Links: 

  • Add web parts to any page: append  ?PageView=Shared&ToolPaneView=2
  • Create New Site Content (List, Library, etc)  /_layouts/create.aspx
  • Create New Site: _layouts/NewsbWeb.aspx
  • List Template Gallery: _catalogs/lt/Forms/AllItems.aspx
  • Master Page Gallery: _catalogs/masterpage/Forms/AllItems.aspx
  • Manage your Alerts  _layouts/SubEdit.aspx 
  • Create New Alert: _layouts/SubChoos.aspx
  • Manage Site Collection Administrators  /_layouts/mngsiteadmin.aspx
  • Manage Sites and Workspaces /_layouts/mngsubwebs.aspx
  • Manage People  /_layouts/people.aspx
  • All People view: /_layouts/people.aspx?MembershipGroupId=0
  • Manage User Permissions /_layouts/user.aspx
  • Modify Navigation  /_layouts/AreaNavigationSettings.aspx
  • Modify Site Navigation: _layouts/SiteNavigationSettings.aspx
  • Recycle Bin /_layouts/AdminRecycleBin.aspx
  • Site Directory _layouts/SiteDirectorySettings.aspx
  • Save Site as Template: _layouts/savetmpl.aspx
  • Site Settings page: _layouts/settings.aspx
  • Create New Web Part Page: _layouts/spcf.aspx
  • Site Template Gallery : _catalogs/wt/Forms/Common.aspx
  • Site Column Gallery  /_layouts/mngfield.aspx
  • Site Content Types /_layouts/mngctype.aspx
  • User Information List /_catalogs/users/simple.aspx
  • Site Content and Structure Manager /_layouts/sitemanager.aspx
  • Site Usage Summary /_layouts/SpUsageWeb.aspx
  • User Alerts  /_layouts/sitesubs.aspx
  • View All Site Content /_layouts/viewlsts.aspx
  • Web Part Gallery: _catalogs/wp/Forms/AllItems.aspx
  • Web part maintenance mode:  append ?contents=1 to the URL of the page
  • Login as another user: /_layouts/closeConnection.aspx?loginasanotheruser=true
  • Open the page in Edit Mode:  In Address bar, Type "javascript:MSOLayout_ToggleLayoutMode();" or "javascript:MSOTlPn_ShowToolPane(’2′);" in the Address bar 


Friday, June 22, 2018

DEFAULT ULS LOGS ON OFFICE WEB APPS (OWA) 2013 SERVER


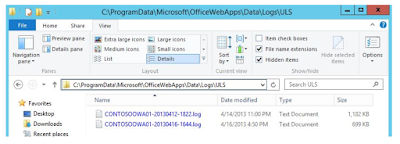
For troubleshoot office web app, we would need the OWA log. By default, the office web apps Unified Logging Service (ULS) logs are stored in the following location.

"C:\ProgramData\Microsoft\OfficeWebApps\Data\Logs\ULS"


Default office web app ULS logs location

As per the best practices, we should place the office web apps ULS logs to any drive/volume other than the system drive . volume such as "E:" drive / volume 

Thursday, June 21, 2018

ADDITIONS TO THIS WEB SITE HAVE BEEN BLOCKED - SHAREPOINT


Scenario/Problem Statement: On SharePoint platform, I was trying change the SharePoint secondary admin. I'm getting the following error.


Solutions: Go actually to Central Administration > Application Management > Site Collections > Configure quotas and locks and change the “Lock status” for the site to Not locked.


OR

You can open up PowerShell console as administrator and run the following command.


SET-SPSITE HTTP://SITECOLLECTIONURL -LOCKSTATE UNLOCK


Saturday, June 16, 2018

OFFICE WEB APP ERROR: SORRY, THERE WAS A PROBLEM AND WE CAN'T OPEN THIS DOCUMENT


Scenario: On SharePoint 2013 platform, I am trying to open Word documents using Office Web Apps. When trying to open it I'm getting the following error.

OWA will not work:  https://webapp/sites/subsite/With Space


Solution:  Apply the patch that Microsoft has recently released its patch on April 11, 2017. 

Microsoft has recently released its patch on April 11, 2017 for SharePoint on this issue. Apply below patch (be patience if you don't see anything happening on the screen for couple of minutes) on all SharePoint servers only (not OWA ones).

Hope that will help someone.

Tuesday, June 12, 2018

SIGN IN AS A DIFFERENT USER IN SHAREPOINT 2013


SharePoint used to have a menu option called “Sign in as Different User” in the top-right corner of every page. It was a handy tool for developers and IT professionals in SharePoint 2007 and 2010, which allowed them to login with another account to test their solutions or customizations. Microsoft removed the option in SharePoint 2013, but you can still do it with workarounds

HOW TO SIGN IN AS A DIFFERENT USER

Developers and/or IT administrators, myself included often, have to log in with a different user account to test their solutions or customizations, or get a higher-level permissions in a SharePoint site. Even though the menu option is missing, there are several workarounds that can be used to log in as a different user in SharePoint 2013.
Method 1: Internet Explorer’s Different User Option
The most common way to sign in as a different user is with Internet Explorer’s “Run as different user” option. Just right-click the IE icon while holding the shift key down and click on “Run as different user.” Once logged in, just navigate to the SharePoint site. This method is quite cumbersome but it does allow you to run multiple instances of IE and be logged in as a different user in each one.
Note for the Windows 7 or 8 users: if you have IE pinned to your taskbar, holding the shift key and right-clicking on the taskbar icon won’t work. You have to right-click the IE icon in the taskbar first, then hold the shift key and right-click on the Internet Explorer option.


Method 2: Navigate to the Close Connection Page
A slightly faster way to accomplish this is to navigate to the Close Connection page. Just visit the following URL in your browser:
http://<SITE URL>/_layouts/closeConnection.aspx?loginasanotheruser=true
As soon as you hit this page, the familiar pop-up will prompt you for the username to log in with. Once you log in, you will be redirected to the home page.

REDUCE GROWING DISK SPACE BY REDUCING LOGGING/USAGE DATABASE SIZE


SharePoint Usage/ logging database grows very fast and it cause the storage problem most of the time in SharePoint.By default SharePoint system retains the usage data in the database for 14 days.

To reduce/purge the size of the usage/logging database you have to execute the following script: 

By following PowerShell script the value of retention days for the usage data changes from fourteen (14) day to one (1) day.


Power Shell code to change the retention day for the SharePoint usage data 


After that we need to run the two timer jobs to clean the old data 'Microsoft SharePoint Foundation Usage Data Import' and 'Microsoft SharePoint Foundation Usage Data Processing'.
Go to Sharepoint Central Administration -> Monitoring -> Configure Usage and health data collection-> Log Collection Schedule.
And it will take you to the timer jobs.


Monday, June 11, 2018

HOW TO CHANGE THE URL FOR SHARE POINT CENTRAL ADMINISTRATION


So, basically if you want to extend the Central Administration web application (using GUI or psconfig command) to run on multiple servers, and when you click on SharePoint Central Administration icon you're still redirected to a specific SharePoint server instead of been redirected to the Load Balancing URL. Anyway, as it turns out the URL has to be changed via registry on all SharePoint servers.
To change the URL for SharePoint 2013 Central Administration URL, Open Powershell:
Set-ItemProperty -Path "HKLM:\SOFTWARE\Microsoft\Shared Tools\Web Server Extensions\15.0\WSS\" -Name CentralAdministrationURL -Value 'https://CENTRALADMINURL/'
To get the URL for SharePoint 2013 Central Administration URL, Open Powershell:
Get-ItemProperty -Path "HKLM:\SOFTWARE\Microsoft\Shared Tools\Web Server Extensions\15.0\WSS\" -Name CentralAdministrationURL

Sunday, June 10, 2018

THE OPERATION FAILED BECAUSE THE SERVER COULD NOT ACCESS THE DISTRIBUTED CACHE, SHAREPOINT


Problem Statement:
SharePoint returned the following error: The operation failed because the server could not access the distributed cache. Internal type name: Microsoft.Office.Server.Microfeed.MicrofeedException. Internal error code: 55. Contact your system administrator for help in resolving this problem.
Solution:
The common problem here is that, the app pool account hosting User profile service application / Distributed service account  does not have access on the user profile service application.
Make sure the Distributed cache cluster is functioning as required.
First Step, Open the IIS manager and identify the App pool account which is running the User Profile service applications.  
Second Step, Open Central Administration Manage Service Application, Select the User Profile service application, Properties and click “Permissions”. In this prompt, put in your service account that is running your Distributed Cache and User profile app pool account, and grant it full control.
. Note: If the above steps does not work, there is some problem with the distributed cache. Try rebuild Distributed Cache and give permission again.

UNDERSTANDING SHAREPOINT 2013 DISTRIBUTED CACHE SERVICE AND FEEDS


In SharePoint Server 2013, Microsoft managed to improve performance by storing objects and data across servers to enable the accelerated execution of many different types of requests and operations. The Distributed Cache service, which is built on Windows Server AppFabric Cache, is set to run in a collocated mode (Dedicated Mode, if more than 10,000 users) on all SharePoint 2013 Servers by default, using up to 10% of the server's total physical memory.
Improving SharePoint 2013 performance relies on the provision of caching functionalities to some key SharePoint features including:
§  Authentication
§  Newsfeeds, micro blogging and conversations
§  OneNote client access
§  Page load performance
§  Security trimming
Caching functionalities, provided by the Distributed Cache service, enable the SharePoint features listed above to quickly retrieve data without any dependency on databases stored in SQL Server, as everything is stored in memory.

The Architecture – How social feeds works with Distributed Cache


Capacity planning for the Distributed Cache service

The following table lists different memory and architecture recommendations for the Distributed Cache service, depending on the total number of users.


Deployment size
Small farm
Medium farm
Large farm
Total number of users
< 10,000
< 100,000
< 500,000
Recommended cache size for the Distributed Cache service
1 GB
2.5 GB
12 GB
Total memory allocation for the Distributed Cache service (double the recommended cache size above)
2 GB
5 GB
24 GB
Recommended architectural configuration
Dedicated server or co-located on a front-end server
Dedicated server
Dedicated server
Minimum cache hosts per farm
1
1
1
  

 Considerations when implementing Distributed Cache


  • As the warning above strongly suggests, do not manage the Distributed Cache service through either the Services MMC snap-in or the generic Windows Server AppFabric tools! Use SharePoint Central Administration and the SharePoint PowerShell cmdlets designed for the purpose.
  • There must be at least one cache host in the farm running the Distributed Cache service
  • Anytime you need to shut down the Distributed Cache service on a cache host (via Stop-SPDistributedCacheServiceInstance cmdlet), such as to remove a cache host from its cache cluster, use the –Graceful switch to avoid data loss. Although it takes longer to shut the service down this way, cached items are preserved (i.e., transferred to another cache host) and end-users get a better experience.
  • The Distributed Cache service must be shut down on a cache host before certain operational and maintenance tasks.
  • The Distributed Cache service must be shut down on a cache host before it is decommissioned as a cache host.
  •  If your SharePoint Servers (specifically, your cache hosts) are virtual machines (VMs), do not use dynamic memory for those VMs. Dynamic memory allows you to squeeze “more” out of a hardware host, but it can cause problems for the Distributed Cache service since actual physical memory assigned to a VM is variable. For Distributed Cache cache hosts, used fixed memory allocations in your VM configurations.
  • When adding and removing cache hosts to a cache cluster, be aware that the Distributed Cache service depends on Internet Control Message Protocol (ICMP) for operation – likely to ping other cache hosts to determine their availability and readiness. This may require you to make firewall changes in your environment and on your cache hosts.
  • All cache hosts in a cache cluster should be configured with the same Distributed Cache service memory allocation, and that value shouldn’t be less than 8GB per server.
  • Don’t allocate more than 16GB of memory to the Distributed Cache service on any single cache host – even if the system has more RAM available. Allocating more than 16GB of memory may cause the server to stop responding for periods in excess of 10 seconds.
  • The maximum number of cache hosts per cache cluster is 16.
  • The Distributed Cache service on a cache host throttles requests when memory consumption approaches 95%. Until memory utilization levels drop back to (approximately) 70%, cache read and write requests are not accepted. Keep an eye on memory usage and the Event Log for signs that a server is memory starved and consider adding additional cache hosts in such circumstances.
  • The SharePoint 2013 Health Analyzer has a few rules that will surface issues with the Distributed Cache service. Keep an eye on Central Administration and Health Analyzer Reports.